Storytelling Part 4: Becoming a Storyteller
Now that the kids understood their stories, they could start to develop as storytellers. They could start to learn about stage presence and the art that goes into storytelling.
Lesson 5/6 Modernizing and Adding Details
Materials
Lesson 6: storytelling packages for each group that you keep collecting….so the kids don’t lose them…trust me…
Lesson 5: An easy story to make anchor points for (we chose The Gingerbead Man)
Lesson 5: Modelling Modernizing and Adding Details
The first time Chantal told a story. I put her on the spot and she told the first part of The Gingerbread Man during this lesson.
As a class, we brainstormed the five anchor point version of the story The Gingerbread Man as well as the phrase that is important to repeat:
Run run as fast as you can, you can’t catch me, I’m the Gingerbread Man. I’ve run away from _____, I run away from _____, and I’ll run away from you!
2. We brainstormed modernizing ideas to create a stronger connection with the audience. The outline on the board looked similar to this:
Beginning:
We set the story in Fort Langley and started at Wendel’s Bookstore and Cafe.
The Gingerbread Man jumped out of a book that was being read by a child (this was a very cool idea!)
Middle
Once out of the coffee shop, the Gingerbread Man was chased towards The Fort first by a dog
Then by a Canadian goose
At The Fort, the Gingerbread Man had to run from my class, which was there on a field trip and it ran towards the train tracks
End:
A train was going by and the conductor told the Gingerbread Man he could save it, so the cookie jumped on board.
The conductor pretended he couldn’t hear the Gingerbread Man over the engines, so he had to…pick him up…bring him close to his ear….and CHOMP….mmmmm it tasted good.
3. Then we told the story. This time, I stepped back! We got FOUR volunteers and my librarian up front. Chantal moved WAY outside of her comfort zone and told the beginning of the story. Each student told one of the remaining anchor points. Each student knew it was their turn to talk when they heard the repeated line. It was amazing.
4. The kids LOVED it so much, we did it a second time with five new kids telling each of the anchor points. The story was different in detail, but same in the weaving around the anchor points. This then allowed us to have a powerful discussion as a class about how the same story is never told exactly the same twice, and that is okay.
Lesson 6
The students took their stories and tried to modernize them. Students telling a story by themselves worked with someone else who was by themselves to bounce ideas around. It was super fun.
Lesson 7 Drama Games (Develop a Stage Presence)
We played four different drama games with the class and all were loved. They have requested future games…including Hot Seat Number the Stars Edition. You can download a pdf of the games we played here. We used these games to talk about our bodies and stage presence. As a class, we explored getting comfortable in front of a crowd.

Lesson 8/9/10 Practice…Panic…Anchor Points Lesson 2
Materials
Stapled package for each storytelling group (both all three lessons)
Storytelling Planner (one per group)
Large sheet of paper and chart paper markers (Lesson 10)
Loose Parts (Lesson 9)
Sticky Notes (Lesson 9)
Lesson 8: Practice/Panic
So, I was away during the first practice. The students were given a storytelling planner sheet to help figure out which parts of the story would be told by each partner and a few other things. I got a few messages from Chantal that the kids were nervous and heard the same from the TOC. Nervous was putting it mildly. When I came back the kids were terrified…so I designed the next lesson to unpack the fears and help the kids feel ready.
Lesson 9: Unpack the Panic

Loose parts can be displayed in many different ways. I used these containers during the pandemic so my loose parts could easily be put away and rotated. It is not as pretty as many displays, but it is very functional.
I structured this lesson around loose parts and group sharing. I wanted to figure out the biggest fears/goals as well as help the kids see they were not alone: everyone has fears! We did two loose parts builds.
Loose Parts 1: Use the loose parts provided to represent the most important part of your story. Be able to explain why this is the most important part.
After having time to build, I gave each student a sticky note to write down why the built what they built. We then used the Say Something strategy from Faye Brownlie’s book Grand Conversations Thoughtful Responses. This gave the kids a chance to think about their story and realize that they did remember it. We also talked about how different partners might see different parts as the most important, and the partners could use this to guide how they divided the story up.
Loose Parts 2: Use the loose parts provided to represent your biggest fear and/or you goal for our storytelling festival.
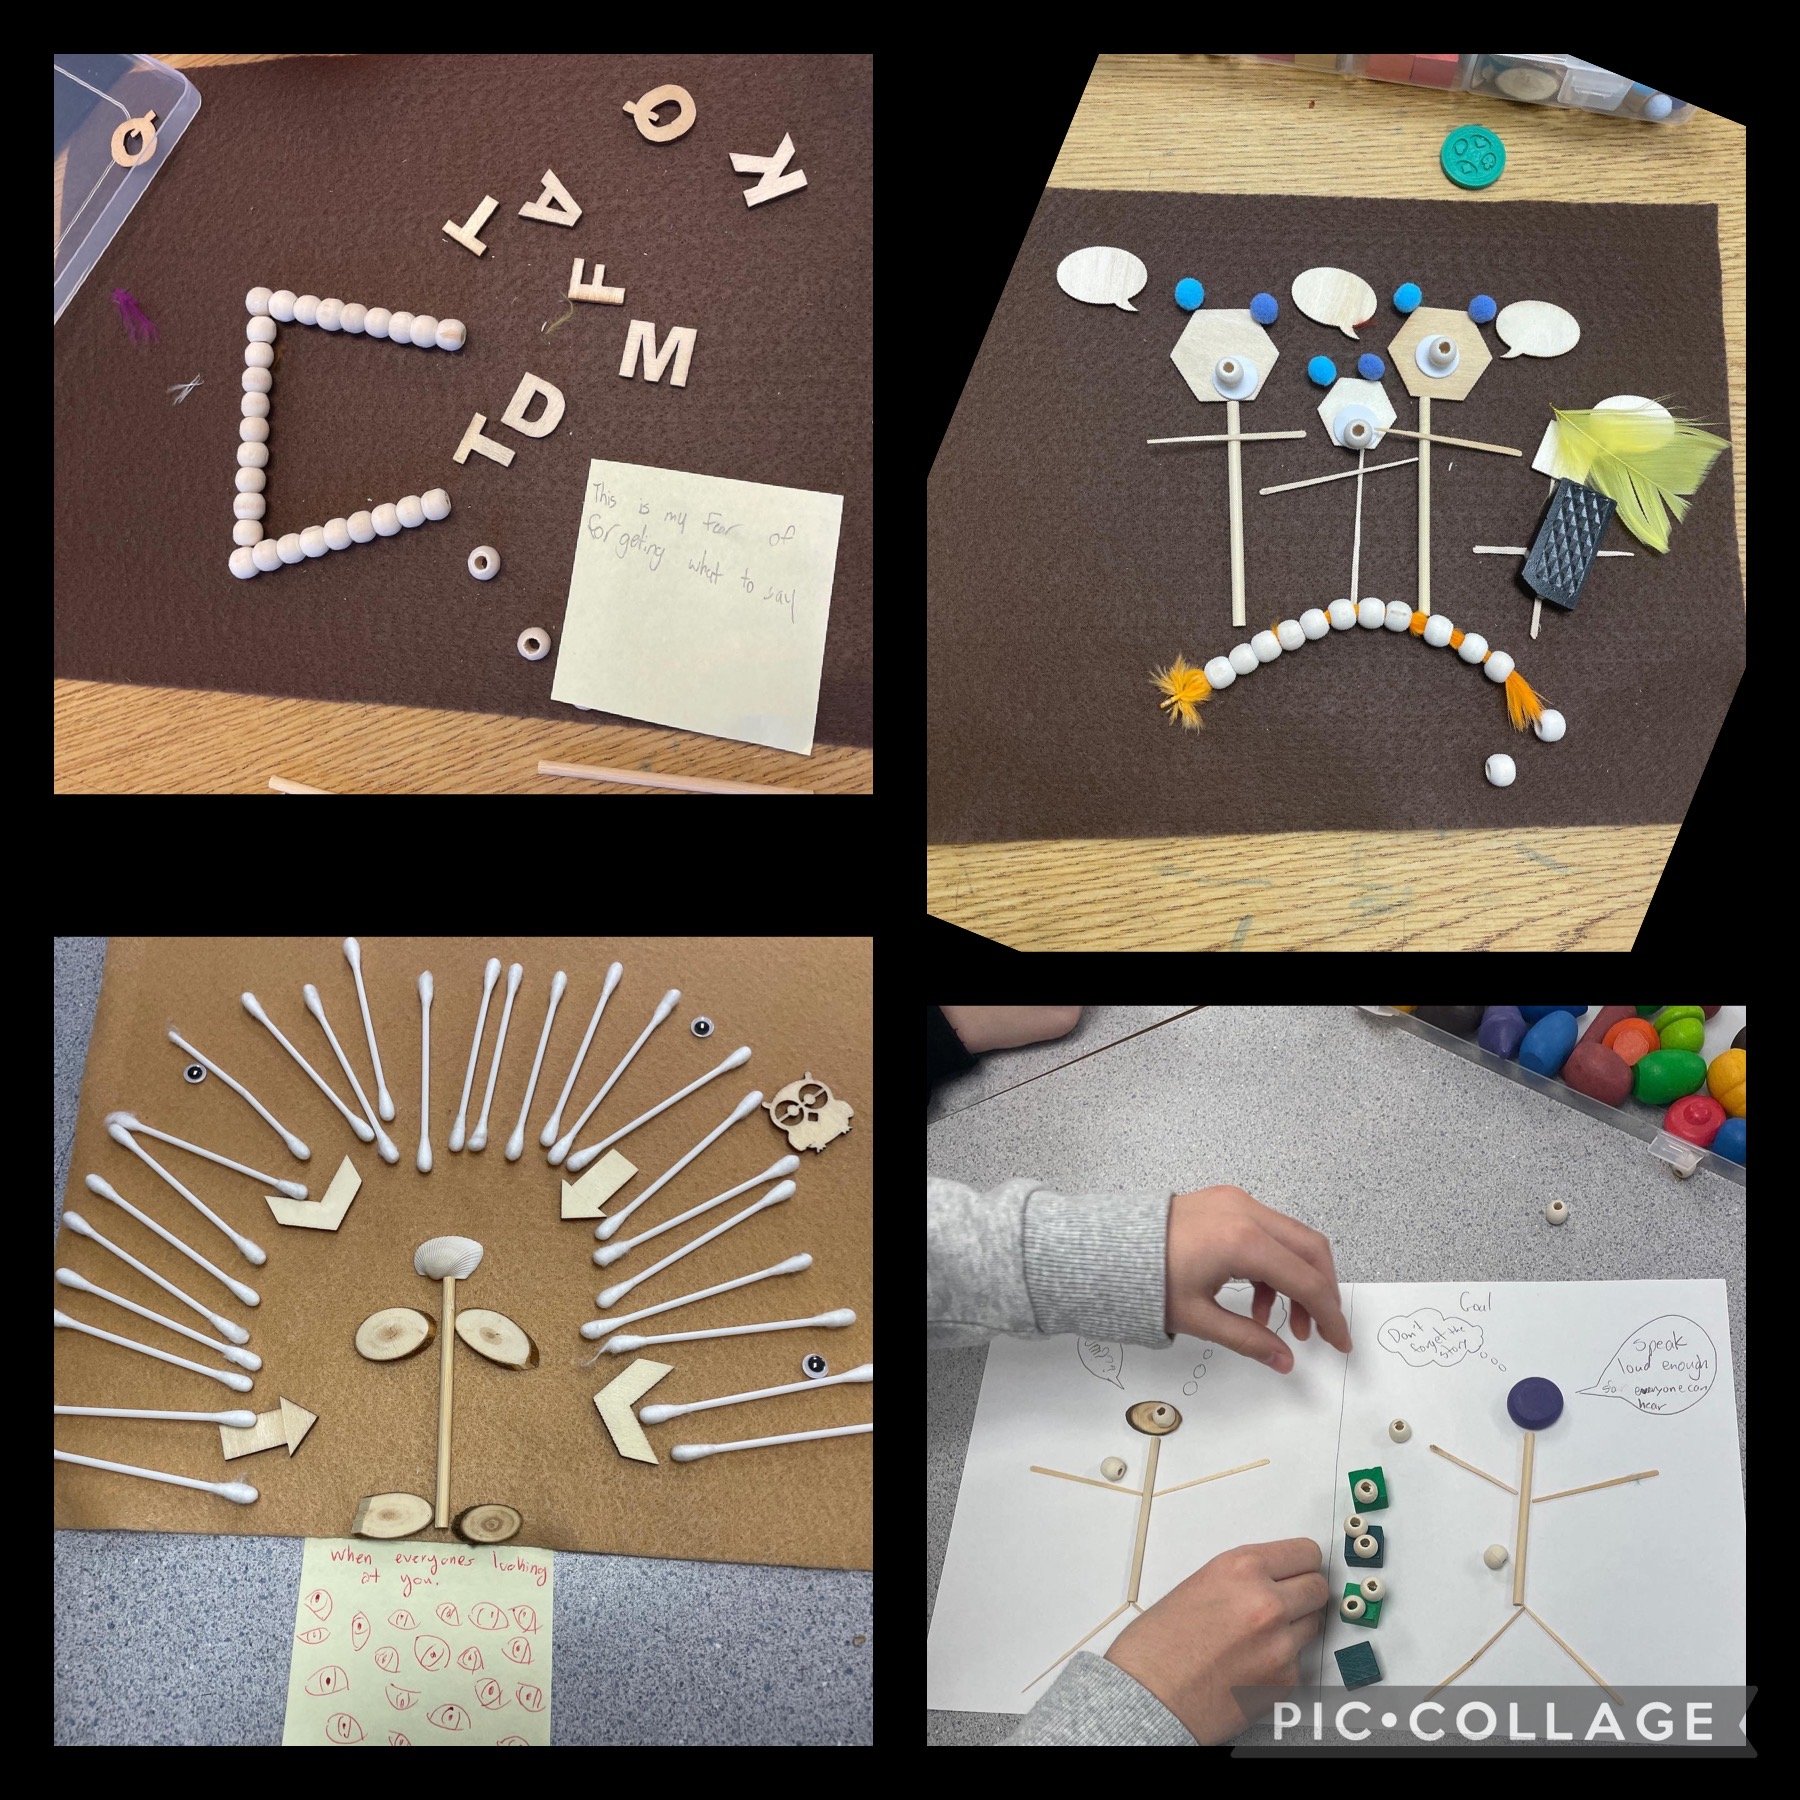
The kids built powerful representations of their emotions. They used a sticky note to explain their thinking. We then did a silent boardwalk as a class to learn about the class wide fears/goals. We noticed that many people were worried about forgetting the story, so I promised as their teacher to think about a solution. I knew they could all be successful and I was here to listen to them and support them.
See if you can find in the picture below which loose parts showed a fear of…forgetting all of the words….having all eyes on the storyteller…
This lesson reminded me of the power of loose parts to concretely represent emotions.
Lesson 10: Anchor Points Lesson 2/Practice
I decided to help the kids, we could take the anchor points and scale them down. The first thing I did, was write my five anchor point plan on the board for The Paper Bag Princess. By this time, the kids were very familiar with the story. I modelled cutting the first anchor point and writing it on a piece of chart paper. The students then helped me do the same for the next five anchor points. We talked about how the chart captured the story through words/images and it would be a useful tool if put at the back of the room for anyone telling the story. If I got lost in telling the story because I was nervous, a quick glance would get me back on track!

I asked my kids if they wanted to make a sheet for their story to be hung at the back of the room during the festival. There was a resounding YES! It took about 15 minutes to complete and made the experience powerful.
The kids hung their anchor charts on the wall and practiced telling their stories from 5-15 ft. away. They barely glanced at the sheet, but it was a comfort. This little thing made a huge difference. It also demonstrated more comprehension…yet another summary with even fewer words.

Next Steps
At this point in the unit…
The kids have learned about making comics (Part 1)
The kids have learned to compare different story types (Part 2)
Have learned to analyze/understand their story for telling (Part 3)
Have developed a stage presence and are ready to perform
What is next? The Storytelling Festival and the assessment! (Part 5)